
实验五 Blockchain
2020 春 《密码学基础》实验
You can also access this document here: http://xpty.xyz/post/blockchain
实验目的
Understanding basic concepts in blockchain.
Implementing a blockchain web application
实验内容
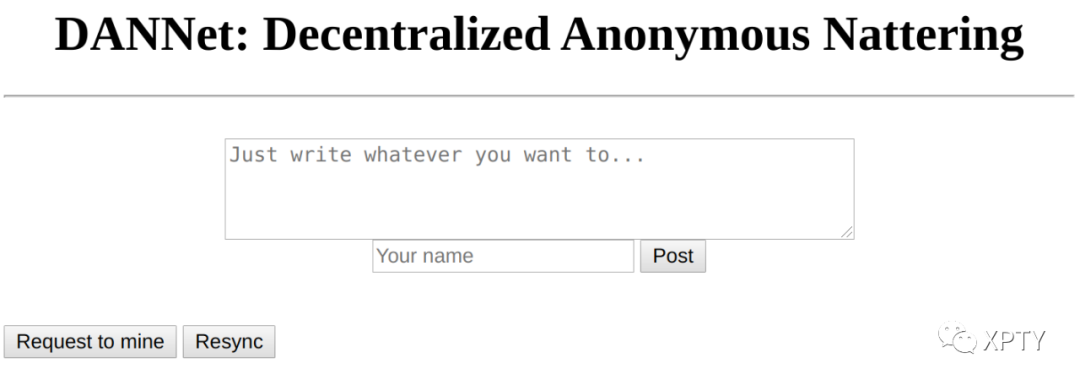
The goal is to build an application that allows users to share information by posting. Since the content will be stored on the blockchain, it will be immutable and permanent. Users will interact with the application through a simple web interface.
实验步骤
pip install flask requests
Fill in node_server.py to complete the experiment.
1. Store transactions into blocks
A post(transaction) is a message that’s posted by any user. Each post will consist of three elements:
Author
Content
Timestamp
Storing transactions (and any data) in blockchain in JSON format[json].
Here’s what a post stored in blockchain should look like:
{
"author": "some_author_name",
"content": "Some thoughts that author wants to share",
"timestamp": "The time at which the content was created"
}
You can refer to https://docs.python.org/3/library/json.html for the usage of
jsonlibrary.
The transactions are packed into blocks. A block can contain one or many transactions. The blocks containing the transactions are generated frequently and added to the blockchain.
Each block has a unique ID index:
class Block:
def __init__(self, index, transactions, timestamp):
"""
Constructor for the `Block` class.
:param index: Unique ID of the block.
:param transactions: List of transactions.
:param timestamp: Time of generation of the block.
"""
self.index = index
self.transactions = transactions
self.timestamp = timestamp
2. Add digital fingerprints to the blocks
Store the hash of the block in a field inside our Block object, and it will act like a digital fingerprint of transactions contained in it:
from hashlib import sha256
import json
def compute_hash(block):
"""
Returns the hash of the block instance by first converting it into JSON string.
"""
# WRITE YOUR CODE HERE !
Note: In real cryptocurrencies like Bitcoin, even the individual transactions in the block are hashed and then stored to form a Merkle tree. The root of the tree usually represents the hash of the block.
We leave implementation of the Merkle tree as optional and only compute the hash of the whole block.
3. Chain the blocks
The blockchain is supposed to be a collection of blocks. We need a way to make sure that any change in the previous blocks invalidates the entire chain. The Bitcoin way to do this is to create dependency among consecutive blocks by chaining them with the hash of the block immediately previous to them. By chaining here, we mean to include the hash of the previous block in the current block in a field called previous_hash.
class Block:
def__init__(self, index, transactions, timestamp, previous_hash):
"""
:param previous_hash: Hash of the previous block in the chain which this block is part of.
"""
self.previous_hash = previous_hash
The very first block int the blockchain is called a genesis block
class Blockchain:
    def __init__(self):        """        Constructor for the `Blockchain` class.        """        self.chain = []
    def create_genesis_block(self):        """        A function to generate genesis block and appends it to the chain. The block has index 0, previous_hash as 0, and a valid hash.        """        # WRITE YOUR CODE HERE !
4. Implement proof of work (POW) algorithm
To make the task of calculating the hash difficult and random, we add a constraint that our hash should start with n leading zeroes where n can be any positive integer.
We’ll also add some dummy data that we can change, a new field in our block called nonce. A nonce is a number that we can keep on changing until we get a hash that satisfies our constraint. The nonce satisfying the constraint serves as proof that some computation has been performed.
The number of zeroes specified in the constraint determines the difficulty of our proof of work algorithm (the greater the number of zeroes, the harder it is to figure out the nonce). The number of zeroes specified in the constraint determines the difficulty of our proof of work algorithm (the greater the number of zeroes, the harder it is to figure out the nonce).
In class Blockchain :
def proof_of_work(self, block):
"""
Function that tries different values of the nonce to get a hash that satisfies difficulty criteria.
return: computed_hash
"""
# WRITE YOUR CODE HERE !
5. Add blocks to the chain
To add a block to the chain, we’ll first have to verify that:
The data has not been tampered with (the proof of work provided is correct).
The order of transactions is preserved (the
previous_hashfield of the block to be added points to the hash of the latest block in our chain).
In class Blockchain :
def is_valid_proof(self, block, block_hash):           """        Check if block_hash is valid hash of block and satisfies the difficulty criteria.        """         # WRITE YOUR CODE HERE !
def add_block(self, block, proof):        """        A function that adds the block to the chain after verification.        Verification includes:        * Checking if the proof is valid.        * The previous_hash referred in the block and the hash of a latest block in the chain match.        """         # WRITE YOUR CODE HERE !
Mining
The transactions will be initially stored as a pool of unconfirmed transactions. The process of putting the unconfirmed transactions in a block and computing proof of work is known as the mining of blocks. Once the nonce satisfying our constraints is figured out, we can say that a block has been mined and it can be put into the blockchain.
In class Blockchain :
def mine(self):
"""
This function adds the pending transactions to the blockchain by adding them to the block and figuring out proof of work.
"""
# WRITE YOUR CODE HERE !
6. Establish consensus and decentralization
We need the data to be distributed, we need multiple nodes maintaining the blockchain. So, to transition from a single node to a peer-to-peer network, let’s first create a mechanism to let a new node become aware of other peers in the network:
# Contains the host addresses of other participating members of the network
peers = set()
# Endpoint to add new peers to the network
@app.route('/register_node', methods=['POST'])
def register_new_peers():
@app.route('/register_with', methods=['POST'])
def register_with_existing_node():
def create_chain_from_dump(chain_dump):
A new node participating in the network can invoke the register_with_existing_node method (via the /register_with endpoint) to register with existing nodes in the network.
Consensus
Due to intentional manipulation or unintentional reasons (like network latency), the copy of chains of a few nodes can differ. In that case, the nodes need to agree upon some version of the chain to maintain the integrity of the entire system. In other words, we need to achieve consensus.
A simple consensus algorithm could be to agree upon the longest valid chain when the chains of different participating nodes in the network appear to diverge. The rationale behind this approach is that the longest chain is a good estimate of the most amount of work done.
In class Blockchain
@classmethod
def check_chain_validity(cls, chain):
"""
to check if the entire blockchain is valid.
"""
# WRITE YOUR CODE HERE !
def consensus():
"""
Our simple consensus algorithm. If a longer valid chain is found, our chain is replaced with it.
"""
# WRITE YOUR CODE HERE !
7. Create interfaces
Using a Python microframework Flask to create a REST API that interacts with and invokes various operations in blockchain node.
You can refer to Flask’s documentation [^flask]
An endpoint for our application to submit a new transaction. This will be used by the application to add new data (posts) to the blockchain
# Flask's way of declaring end-points
@app.route('/new_transaction', methods=['POST'])
def new_transaction():
An endpoint to return the node’s copy of the chain. The application can use this endpoint to query all of the data to display
@app.route('/chain', methods=['GET'])
def get_chain():
An endpoint to request the node to mine the unconfirmed transactions (if any). We can use it to initiate a command to mine from the application itself
@app.route('/mine', methods=['GET'])
def mine_unconfirmed_transactions():
@app.route('/pending_tx')
def get_pending_tx():
8. Build&Run the application
We’ve used Jinja2 templating ^jinja to render the web pages and some CSS to make things look nice.
Running with a single node
Start a blockchain node server:
$ export FLASK_APP=node_server.py
$ flask run --port 8000
One instance of blockchain node is now running at port 8000.
Run the application on a different terminal :
$ python run_app.py
The application is running at http://localhost:5000.
Your application should have the feature to post content, to request a node to mine, and to resync with the chain.

Running with multiple nodes
To run multiple nodes, use the register_with/ endpoint to register a new node with the existing peer network.
You can use the following cURL requests to register the nodes at port 8001 and 8002 with the already running 8000:
$ curl -X POST \  http://127.0.0.1:8001/register_with \  -H 'Content-Type: application/json' \  -d '{"node_address": "http://127.0.0.1:8000"}'
$ curl -X POST \  http://127.0.0.1:8002/register_with \  -H 'Content-Type: application/json' \  -d '{"node_address": "http://127.0.0.1:8000"}'
# already running
$ flask run --port 8000
# run new nodes
$ flask run --port 8001
$ flask run --port 8002
This will make the node at port 8000 aware of the nodes at port 8001 and 8002, and vice-versa.
The newer nodes will also sync the chain with the existing node so that they are able to participate in the mining process actively.
Once you do all this, you can run the application ( python run_app.py) and post messages via the web interface, and once you mine the transactions all the nodes in the network will update the chain.
The chain of nodes can also be inspected by invoking the /chain endpoint using cURL.
$ curl -X GET http://localhost:8001/chain
$ curl -X GET http://localhost:8002/chain
9. Optional: Add Merkle tree support/ Add Signature support
Add Merkle tree support
Instead of computing the hash of the whole block, every individual transactions in the block are hashed and then stored to form a Merkle tree [^merkle]. The root of the tree represents the hash of the block.
Add Signature support
Now in this application , anyone can change any name and post any content. Also, the post is susceptible to tampering while submitting the transaction to the blockchain network. One way to solve this is by creating user accounts using public key cryptography. Every new user needs a public key (analogous to username) and a private key to be able to post in the application. The keys are used to create and verify the digital signature. Here’s how it works:
Every new transaction submitted (post submitted) is signed with the user’s private key. This signature is added to the transaction data along with the user information.
During the verification phase, while mining the transactions, we can verify if the claimed owner of the post is the same as the one specified in the transaction data, and also that the message has not been modified. This can be done using the signature and the public key of the claimed owner of the post.
实验要求和评分
编程语言、编译运行时、所用工具等实验环境原则上不限,建议使用所提供的Python框架补完。如果使用其他语言或框架实现,需要完成同等任务,并在实验报告中写明。
评分内容如下:
100分是本实验的总分,本学期五个实验各100分,学期末会加权得出实验分总分并汇入总成绩
附加分记入后总分不超过100分
| 内容 | 总分100 |
|---|---|
| compute_hash | 10 |
| creategenesisblock | 10 |
| proofofwork | 20 |
| isvalidproof/add_block | 20 |
| mine | 10 |
| checkchainvalidity/consensus | 20 |
| Merkle tree(Optional) | +10 |
| signature(Optional) | +10 |
| Document(实验报告) | 10 |
实验提交
分组规则:不分组,即独立完成
完成提交截止时间: 6月24日23:00前
提交内容清单:需要提交
实验报告 (按照实验报告模板书写,要求提交
pdf格式文件)(命名格式:姓名+学号+实验五.pdf)项目源代码 (命名格式:
学号_blockchain压缩文件夹)提交方式: 所有提交清单中的文件,压缩后, eLearning提交
鼓励录制短视频,介绍代码结构、演示运行结果、分析计算量等
参考资料
https://docs.python.org/3/library/hashlib.html
https://docs.python.org/3/library/json.html
[flask]: https://flask.palletsprojects.com/en/1.1.x/quickstart/
[merkle]: https://en.wikipedia.org/wiki/Merkle_tree